


Hale Pet Doors for Doors


- Aluminum-framed design: Hale Pet Doors available in 4 colors: White, Arizona Beige, Bronze, and Brushed Aluminum
- Flexible fit: Compatible with standard door thickness of 1-3/8" - 2" (custom sizes available)
- Single or double flap options: Ideal for all climates, enhancing energy efficiency
- Versatile for various pet sizes: Adjustable magnet strength and lightweight flap(s) cater to your pet's needs
- Durable and weather-resistant: Long-lasting design ensures longevity and insulation
 Product Details
Product Details
Elevate your pet's freedom and your home's insulation with the sleek and versatile Hale Pet Doors for Doors, which fit standard size fits doors 1 3/8" - 2" thick (a custom build-out for thinner doors down to ¾" is available).
Designed for pets of all sizes, these aluminum-framed doors are available in four elegant colors: White, Arizona Beige, Bronze, and Brushed Aluminum. Choose between single or double flap options to accommodate various climates and enhance energy efficiency, thanks to adjustable magnet strength and lightweight flap design.
These pet doors are compatible with an array of door materials, including aluminum, hollow core, metal, solid core, and steel doors. Each flap features clear, flexible vinyl, fuzzy nylon weather stripping, and magnets for optimal insulation and sealing.
An optional rain cap that hooks to the top edge of the outside frame and helps protect against water intrusion can be purchased separately (if choosing secondary exterior security cover and rain cap, you must choose a side-loading security cover).
Installation is straightforward, and with the ability to mix and match frame colors, you can ensure a seamless match with both the interior and exterior of your home. The pet door includes a robust polycarbonate locking cover and steel pin lock for added security.
Experience the perfect blend of performance, design, and versatility with the Hale Pet Doors for Doors, a pet door that stands out for its quality and longevity.
Features:
- Compatible with various door types: Fits aluminum, hollow core, metal, solid core, and steel doors
- Clear, flexible vinyl flaps: Single or double flap options for moderate and extreme climates
- Optimal insulation and sealing: Fuzzy, nylon weather stripping and magnets for a secure seal
- Enhanced security: Sturdy polycarbonate locking cover and steel pin lock included
- Customizable options: Mix and match frame colors for a seamless fit with your home's decor
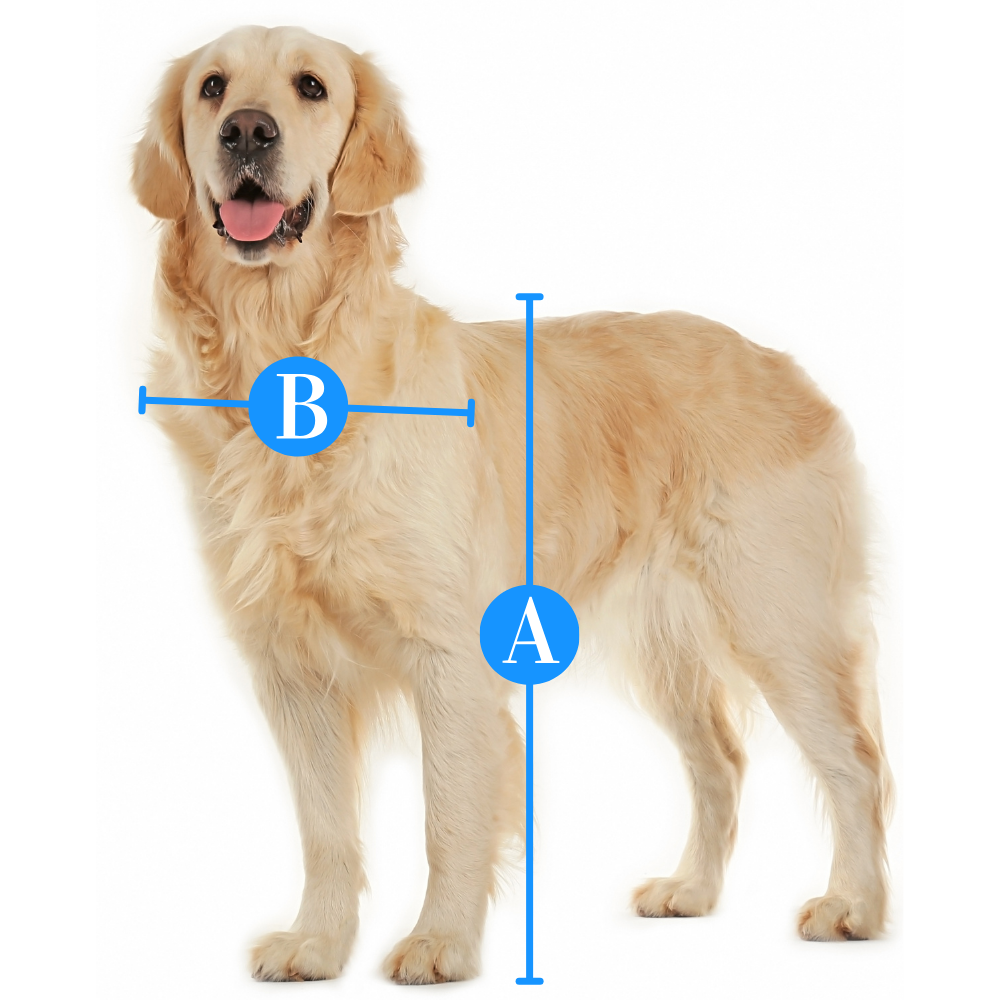
Size Chart
- Small Medium 6 1/2"w x 9 1/2"h
- Medium 8 1/2"w x 12 1/2"h
- Tall Medium 8 1/2"w x 16"h
- Large 11"w x 16"h
- Tall Large 11"w x 19"h
- Tall Large Plus 11"w x 23 1/2"h
- Extra Tall Large 11"w x 27 1/2"h
- Extra Large 14"w x 19 1/2"h
- Extra Large Plus 14"w x 23 1/2"h
- Giant 15 1/2"w x 27 1/2"h
Flap Dimensions:
6 1/2"w x 9 1/2"h
The entry way your dog goes through.Outside Frame Dimensions
9 9/16"w x 12 9/16"h
The outer edge of the pet door.


Rough Cut Out:
8 1/2"w x 12 1/2"h
The size of the hole needed to fit your pet door into your door.Flap Dimensions:
8 1/2"w x 12 1/2"h
The entry way your dog goes through.Outside Frame Dimensions
11 9/16"w x 15 3/8"h
The outer edge of the pet door.


Rough Cut Out:
10 1/2"w x 14 1/2"h
The size of the hole needed to fit your pet door into your door.Flap Dimensions:
8 1/2"w x 16"h
The entry way your dog goes through.Outside Frame Dimensions
11 9/16"w x 19 1/16"h
The outer edge of the pet door. Rough Cut Out:
10 1/2"w x 18"h
The size of the hole needed to fit your pet door into your door.Flap Dimensions:
11"w x 16"h
The entry way your dog goes through.Outside Frame Dimensions
14 1/16"w x 19 1/16"h
The outer edge of the pet door. Rough Cut Out:
13"w x 18"h
The size of the hole needed to fit your pet door into your door.Flap Dimensions:
11"w x 19 1/2"h
The entry way your dog goes through.Outside Frame Dimensions
14 1/16"w x 22 9/16"h
The outer edge of the pet door. Rough Cut Out:
13"w x 21 5/8"h
The size of the hole needed to fit your pet door into your door.Flap Dimensions:
11"w x 23 1/2"h
The entry way your dog goes through.Outside Frame Dimensions
14 1/16"w x 26 9/16"h
The outer edge of the pet door. Rough Cut Out:
13"w x 25 5/8"h
The size of the hole needed to fit your pet door into your door.Flap Dimensions:
11"w x 27 1/2"h
The entry way your dog goes through.Outside Frame Dimensions
14 1/16"w x 30 6/16"h
The outer edge of the pet door. Rough Cut Out:
13"w x 29 5/8"h
The size of the hole needed to fit your pet door into your door.Flap Dimensions:
14"w x 19 1/2"h
The entry way your dog goes through.Outside Frame Dimensions
17 1/16"w x 22 9/16"h
The outer edge of the pet door.


Rough Cut Out:
16"w x 21 5/8"h
The size of the hole needed to fit your pet door into your door.Flap Dimensions:
14"w x 23 1/2"h
The entry way your dog goes through.Outside Frame Dimensions
17 1/16"w x 26 9/16"h
The outer edge of the pet door. Rough Cut Out:
16"w x 25 5/8"h
The size of the hole needed to fit your pet door into your door.Flap Dimensions:
15 1/2"w x 27 1/2"h
The entry way your dog goes through.Outside Frame Dimensions
18 9/16"w x 30 9/16"h
The outer edge of the pet door. Rough Cut Out:
17 5/8"w x 29 5/8"h
The size of the hole needed to fit your pet door into your door.| Flap Size | Flap Dimension | Rough Cut Out | Outside Frame Dimension | Flap Type |
|---|---|---|---|---|
| Double | ||||
| Small Medium | 6 1/2" w x 9 1/2" h | 8 1/2" w x 11 1/2" h | 9 9/16" w x 12 9/16" h | Single |
| Double | ||||
| Medium | 8 1/2" w x 12 1/2" h | 10 1/2" w x 14 1/2" h | 11 9/16" w x 15 3/8" h | Single |
| Double | ||||
| Tall Medium | 8 1/2" w x 16" h | 10 1/2" w x 18" h | 11 9/16" w x 19 1/16" h | Single |
| Double | ||||
| Large | 11" w x 16" h | 13" w x 18" h | 14 1/16" w x 19 1/16" h | Single |
| Double | ||||
| Tall Large | 11" w x 19 1/2" h | 13" w x 21 5/8" h | 14 1/16" w x 22 9/16" h | Single |
| Double | ||||
| Tall Large Plus | 11" w x 23 1/2" h | 13" w x 25 5/8" h | 14 1/16" w x 26 9/16" h | Single |
| Double | ||||
| Extra Tall Large | 11" w x 27 1/2" h | 13" w x 29 5/8" h | 14 1/16" w x 30 9/16" h | Single |
| Double | ||||
| Extra Large | 14" w x 19 1/2" h | 16" w x 21 5/8" h | 17 1/16" w x 22 9/16" h | Single |
| Double | ||||
| Extra Large Plus | 14" w x 23 1/2" h | 16" w x 25 5/8" h | 17 1/16" w x 26 9/16" h | Single |
| Double | ||||
| Giant | 15 1/2" w x 27 1/2" h | 17 5/8" w x 29 5/8" h | 18 9/16" w x 30 9/16" h | Single |
| Double |
Installation Instructions
 Difficulty
Difficult
Difficulty
Difficult
 Steps
10
Steps
10
 Time Required
1 - 2 hours
Time Required
1 - 2 hours
 Sections
03
Sections
03
 Flags
05
Flags
05
Parts
- Hale pet door frame
- 1 Instructions and Warranty for Hale Pet Door
- 1 Locking cover 5/8”
- 5/8” #6 Phillips head screws
- 7/64” drill bit
- 4 2-1/4" (5,7cm) screws
- 1 raincap (optional; must be purchased separately)
Tools
- Blue tape
- Drill
- Jigsaw or Reciprocating Saw
- Measuring Tape
Please read instructions & notes thoroughly before installation.
Wood Door Installation
Step 1 Pre-Installation Prep

- Review the large illustration of the pet door at the end of the instructions and familiarize yourself with the various components.
Step 2 Decide Where to Install Door
- Decide where to place your pet door. A good idea is to make sure that there are no knobs or other obstructions above the pet door that could interfere with the security cover.
- Second, be sure that the rough opening will be at least four inches from the bottom and from the side of the 'people' door. This will maintain the integrity of the door. (This measurement may vary depending on the size and type of door being used.)
Step 3 Makes Marks On Door


- Mary the installation area using a level for accuracy. Use masking tape to record the placement before drilling.
- Measure and mark all four sides before sawing. Use masking tape to mark the rectangle. Use the rough cutout table pictured to get the correct size rough opening for your size door:
Step 4 Cut Hole Out Of Door


- After the holes are connected, use a reciprocating saw, scroll saw or jig saw to cut out the opening along the lines you've marked.
Optional Step Attach Rain Cap


- If you elected to use the rain cap for your petdoor installation, attach it to the outer frame as shown. It will simply hook onto the top of the outer frame
Step 5 Place Frame In Door


- Place the inside frame of the pet door into the opening in the door. Place the outside frame of the pet door into the other side of the door and let the pet door frame telescope together. Squeeze the two sides of the pet doors frame together tightly. You may hold them together with carpenter's clamps as you proceed.
Step 6 Screw Door Into Place

- Using the pre-drilled pilot holes in the pet door frame and the supplied drill bit, drill one hole through the inside edge of the outside frame at the bottom. Insert and loosely tighten one screw. Make sure the door is level and adjust if needed.
- When door is level, tighten the inserted screw and repeat drilling and inserting the rest of the screws in the pet door frame. Also, retighten the screws that hold the pin bolt lock in place.
Step 7 Seal Gaps With Caulk

- Once the pet door is installed you can fill any gaps or seal the edges with caulking if desired.
- After you apply the caulking and smooth it, you can remove the tape for a clean edge and no mess on your people door.
Step 8 Slide Locking Cover On

- The Starboard® cover will slide easily into place in the built in frame and can be easily locked and unlocked with the positive action pin bolt lock.
Step 10 Clean-Up Door

- Remove the drop cloths and clean up the area. We recommend cleaning the frame and flaps of the pet door also. Use soap and water or glass cleaner without ammonia.
How to Adjust Magnets
You may also adjust the magnets in the frame if necessary. They can either be raised or lowered so the flaps seal but swing freely.
Adjust Upward
- Adjust the magnets upward by twisting a flat headed screwdriver below the magnet between the magnet and the frame.
Adjust Downward
- Adjust the magnets downward by tapping lightly with the handle of your screwdriver.
Note:
- NEVER hit a magnet hard with a hammer as this may bend the legs of the magnet and cause it to eventually fall out of the door track.
![]()
Notes for Various Types of Doors
Raised Panel Doors
![]()
Two types of raised panel door are illustrated above. A true raised panel door will be built of solid wood, and the panels will be separate pieces of wood contained in the body of the door. This type of door is common on older homes, but in newer homes you are more likely to find doors whose surfaces have been molded to look like a raised panel door.
Carefully consider placement of your pet door before cutting the rough opening. Ideally, the pet door should be either centered on the door or centered on a panel. If the door is a true raised panel door, centering the pet door on the people door is not a good idea. Cutting out the vertical support will structurally weaken the door.
Once you have determined where to place the door, cut out the rough opening and install the pet door as described above. There should be gaps that need to be filled between the pet door and the door where the grooves from the raised panel are. Put blue masking tape on the door so that the bottom of the tape is even with the top of the pet door. Fill the gaps with "caulking backer rod". Make sure your filler does not come up to the edge of the pet door frame.
Fill the gap with caulk of an appropriate type and color. Smooth the caulk with a putty knife or a razor blade. Remove the blue tape carefully. Clean up and you are finished.
Cross Hatch Doors
![]()
To drill starter holes through a solid wood door, use a 7/8" paddle bit and drill almost all the way through the door. Go to the other side of the door and finish the hole. This will prevent splintering wood.
![]()
A crosshatch door, also called a farmhouse door, usually has a window in the upper half. The lower half is constructed very much like a raised panel door, but the panels are usually sunken in compared to the rest of the door. These doors are almost always solid wood. Be very careful when drilling your starter holes in wood. If you push too hard the wood may splinter.
Installation of the pet door is about the same as with any other door. The difficulty is filling in the gaps. Depending on how deep the gap is, there are several different ways to approach this. If the gap is not very deep, caulking backer rod and caulk will work nicely. If the gap is deep you may want to consider filling with pieces of wood. This will require a hacksaw, miter box, and careful measuring.
Hollow Core Doors
If you are installing in a hollow core door, don’t cut your rough opening with a reciprocating saw if you can avoid it. It tends to shake the door surface violently, sometimes separating it from the interior “honeycomb”. Use a circular saw and diamond blade. It makes a clean, easy cut.
Fiberglass Doors
Fiberglass doors can be cut with a reciprocating saw or a circular saw with a diamond blade but be sure to wear a good dust mask! You do not want to be inhaling fiberglass.
Wood Doors
Cut wood doors with a reciprocating saw. Do not try to use the circular saw. The diamond blade will simply scorch the wood, barely cutting it, and a wood blade will grab the wood and take off, which will be dangerously hard to control.
Steel Skin Doors
Steel skin doors are made of a foam core covered with thin steel skin. If the pet door you are installing is small, (medium or smaller), you can cut the rough opening with a diamond blade and clean up the corners with a reciprocating saw. If the pet door is larger than a medium, sink the diamond blade into the door in one spot on all four sides of the rough opening. This creates four grooves you can get a reciprocating saw blade into. Use a fine blade on the reciprocating saw. (18-tooth per inch at a minimum.)
FAQ
What is the main difference between this weather proof and others?The Hale pet door offers a flexible, vinyl flap while other weatherproof models choose harder flap material, such as the freedom pet pass pet door with a canvas flap. These vinyl flaps are thicker than standard, offering a greater resistance to extreme weather. |
How can I make the Hale Double Flap Dog Door easier for my small pet to use?You can remove magnets to make the flap easier for smaller pets to push through. |
Why would I need a left or right locking load?Hale gives you options on how your locking cover opens based on the unique locations your door will be in. These options are included in case there is a lip above your frame that would stop your locking cover from sliding up. You can open your cover left or right depending on other obstructions on either side of the installation location. |
Where do you buy replacement flaps?Hale Replacement Flaps can be bought on our site. These flaps do not have logos on them, so it would be best to measure the flaps to make sure the correct size is ordered. |
What is the difference between single and double flap Hale pet doors?The Hale double flap dog door increases resistance to extreme weather. These are great options for blazing summer and snowy winters. While a Hale single flap can do the job of some double flap models, the additional vinyl can safeguard from wind and single digit temperatures. |
Does this door come in other colors?Yes; it comes in Satin, Arizona Beige (Tan), White, and Bronze. See pictures above for color samples. |
Can I attach a locking cover on both sides of the Hale dog door unit?If you want a locking cover on both sides, that would be a special order. Please let us know beforehand if you want to make that happen. Once you have the door in your home, an additional locking cover cannot be added the other side. The exterior locking cover can also only be manufactured to open from the left or right. |
Can my cats use a double flap?Cats should be able to push through a double flap mount, even if it is a doggy door for big dogs. It helps there will be a tunnel, since the two flaps will not be back to back so your cat will only go through one flap at a time. Even the large Hale pet door sizes have lightweight flaps that are manageable for small pets. If they are still having difficulty, you can also remove some magnets to lessen the resistance. |
If I get a single flap can I add another one later?Yes! All you would have to do is purchase a replacement flap kit, which comes with everything you need. |
Can you use this on a dutch door?Yes, this is a really good choice for that because if there is anything (like a sill above it sticking out) then you can choose one of the side load locking cover options. |
Is this the same as the maxseal?No, that is made by a different manufacturer and parts and dimensions are not the same. |
Can I install this into my wall?To install a Hale door into a wall, check out the Hale Pet Door for Walls. |
Warranty
LIFETIME FRAME WARRANTY / 10 - YEAR PARTS WARRANTY INCLUDING FLAPS
HALE PET DOOR™
LIFETIME FRAME WARRANTY
(10 YEAR PARTS WARRANTY - INCLUDING FLAPS)
Thank you for doing business with Hale Pet Door™. We are sure you will receive years of excellent service with your purchase. If the product does not meet your expectations, please contact our office for return authorization and return it within 30 days of purchase for a full refund of the purchase price. Be sure to pack the product well as we can only give 50% credit for a damaged pet door.
Hale Pet Door guarantees and warrants, subject to the conditions and restrictions stated below, that the Hale Pet Door™ products and component parts thereof, purchased from Hale Pet Door shall be free from any defects in materials and workmanship. The warranty period for all Hale Pet Door™ model pet doors is effective from the date of purchase and extends to the anniversary date marking the end of the tenth year. We agree to exchange at our expense.
New and Improved Flaps with the Best Vinyl Imported from France, Made with the Custom Hale Pet Door Chemical Recipe
The Best Lifetime Frame Warranty - (No Questions Asked, Does Not Include Flaps, Parts, Shipping, or Labor)
- 1st and 2nd year – 100% of all parts are covered
- 3rd and 4th year - 80% of all parts are covered
- 5th and 6th year – 60% of all parts are covered
- 7th and 8th year – 40% of all parts are covered
- 9th and 10th year – 20% of all parts are covered
This warranty does not include shipping to Hale Pet Door or any field service labor.
A-Glass Breakage: We use fully tempered glass of the greatest quality and strength available for each application in our window, panel and storm window replacement model pet doors. It also meets or exceeds all safety glazing laws and codes in the United States. Even tempered glass will break on occasion, but it is very rare. When there is a breakage of glass, for whatever reason, within the FIRST YEAR, we will replace the unit for 50% of the current total price. There is no warranty on glass after the first year. This warranty excludes the glass in windows and doors through which our in-glass models are installed. For glass breakage in those instances, you would need to contact the company who installed your window or people door.
Hale Pet Door will credit 50% towards the cost of a replacement Hale Pet Door™ that was damaged due to miscutting, mismeasuring or any other damage due to no fault of Hale Pet Door within 30 days of purchase. Hale Pet Door will not accept any responsibility beyond 50% if damage is due to no fault of Hale Pet Door. This document supersedes all previous warranty documents.
Customer Reviews

Size Chart
- Small Medium 6 1/2"w x 9 1/2"h
- Medium 8 1/2"w x 12 1/2"h
- Tall Medium 8 1/2"w x 16"h
- Large 11"w x 16"h
- Tall Large 11"w x 19"h
- Tall Large Plus 11"w x 23 1/2"h
- Extra Tall Large 11"w x 27 1/2"h
- Extra Large 14"w x 19 1/2"h
- Extra Large Plus 14"w x 23 1/2"h
- Giant 15 1/2"w x 27 1/2"h
Flap Dimensions:
6 1/2"w x 9 1/2"h
The entry way your dog goes through.Outside Frame Dimensions
9 9/16"w x 12 9/16"h
The outer edge of the pet door. Rough Cut Out:
8 1/2"w x 12 1/2"h
The size of the hole needed to fit your pet door into your door.Flap Dimensions:
8 1/2"w x 12 1/2"h
The entry way your dog goes through.Outside Frame Dimensions
11 9/16"w x 15 3/8"h
The outer edge of the pet door. Rough Cut Out:
10 1/2"w x 14 1/2"h
The size of the hole needed to fit your pet door into your door.Flap Dimensions:
8 1/2"w x 16"h
The entry way your dog goes through.Outside Frame Dimensions
11 9/16"w x 19 1/16"h
The outer edge of the pet door. Rough Cut Out:
10 1/2"w x 18"h
The size of the hole needed to fit your pet door into your door.Flap Dimensions:
11"w x 16"h
The entry way your dog goes through.Outside Frame Dimensions
14 1/16"w x 19 1/16"h
The outer edge of the pet door. Rough Cut Out:
13"w x 18"h
The size of the hole needed to fit your pet door into your door.Flap Dimensions:
11"w x 19 1/2"h
The entry way your dog goes through.Outside Frame Dimensions
14 1/16"w x 22 9/16"h
The outer edge of the pet door. Rough Cut Out:
13"w x 21 5/8"h
The size of the hole needed to fit your pet door into your door.Flap Dimensions:
11"w x 23 1/2"h
The entry way your dog goes through.Outside Frame Dimensions
14 1/16"w x 26 9/16"h
The outer edge of the pet door. Rough Cut Out:
13"w x 25 5/8"h
The size of the hole needed to fit your pet door into your door.Flap Dimensions:
11"w x 27 1/2"h
The entry way your dog goes through.Outside Frame Dimensions
14 1/16"w x 30 6/16"h
The outer edge of the pet door. Rough Cut Out:
13"w x 29 5/8"h
The size of the hole needed to fit your pet door into your door.Flap Dimensions:
14"w x 19 1/2"h
The entry way your dog goes through.Outside Frame Dimensions
17 1/16"w x 22 9/16"h
The outer edge of the pet door. Rough Cut Out:
16"w x 21 5/8"h
The size of the hole needed to fit your pet door into your door.Flap Dimensions:
14"w x 23 1/2"h
The entry way your dog goes through.Outside Frame Dimensions
17 1/16"w x 26 9/16"h
The outer edge of the pet door. Rough Cut Out:
16"w x 25 5/8"h
The size of the hole needed to fit your pet door into your door.Flap Dimensions:
15 1/2"w x 27 1/2"h
The entry way your dog goes through.Outside Frame Dimensions
18 9/16"w x 30 9/16"h
The outer edge of the pet door. Rough Cut Out:
17 5/8"w x 29 5/8"h
The size of the hole needed to fit your pet door into your door.| Flap Size | Flap Dimension | Rough Cut Out | Outside Frame Dimension | Flap Type |
|---|---|---|---|---|
| Double | ||||
| Small Medium | 6 1/2" w x 9 1/2" h | 8 1/2" w x 11 1/2" h | 9 9/16" w x 12 9/16" h | Single |
| Double | ||||
| Medium | 8 1/2" w x 12 1/2" h | 10 1/2" w x 14 1/2" h | 11 9/16" w x 15 3/8" h | Single |
| Double | ||||
| Tall Medium | 8 1/2" w x 16" h | 10 1/2" w x 18" h | 11 9/16" w x 19 1/16" h | Single |
| Double | ||||
| Large | 11" w x 16" h | 13" w x 18" h | 14 1/16" w x 19 1/16" h | Single |
| Double | ||||
| Tall Large | 11" w x 19 1/2" h | 13" w x 21 5/8" h | 14 1/16" w x 22 9/16" h | Single |
| Double | ||||
| Tall Large Plus | 11" w x 23 1/2" h | 13" w x 25 5/8" h | 14 1/16" w x 26 9/16" h | Single |
| Double | ||||
| Extra Tall Large | 11" w x 27 1/2" h | 13" w x 29 5/8" h | 14 1/16" w x 30 9/16" h | Single |
| Double | ||||
| Extra Large | 14" w x 19 1/2" h | 16" w x 21 5/8" h | 17 1/16" w x 22 9/16" h | Single |
| Double | ||||
| Extra Large Plus | 14" w x 23 1/2" h | 16" w x 25 5/8" h | 17 1/16" w x 26 9/16" h | Single |
| Double | ||||
| Giant | 15 1/2" w x 27 1/2" h | 17 5/8" w x 29 5/8" h | 18 9/16" w x 30 9/16" h | Single |
| Double |
Difficulty
Difficult
Steps
10
Time Required
1 - 2 hours
Sections
03
Flags
05
Parts
- Hale pet door frame
- 1 Instructions and Warranty for Hale Pet Door
- 1 Locking cover 5/8”
- 5/8” #6 Phillips head screws
- 7/64” drill bit
- 4 2-1/4" (5,7cm) screws
- 1 raincap (optional; must be purchased separately)
Tools
- Blue tape
- Drill
- Jigsaw or Reciprocating Saw
- Measuring Tape
Please read instructions & notes thoroughly before installation.
Wood Door Installation
Step 1 Pre-Installation Prep
- Review the large illustration of the pet door at the end of the instructions and familiarize yourself with the various components.
Step 2 Decide Where to Install Door
- Decide where to place your pet door. A good idea is to make sure that there are no knobs or other obstructions above the pet door that could interfere with the security cover.
- Second, be sure that the rough opening will be at least four inches from the bottom and from the side of the 'people' door. This will maintain the integrity of the door. (This measurement may vary depending on the size and type of door being used.)
Step 3 Makes Marks On Door
- Mary the installation area using a level for accuracy. Use masking tape to record the placement before drilling.
- Measure and mark all four sides before sawing. Use masking tape to mark the rectangle. Use the rough cutout table pictured to get the correct size rough opening for your size door:
Step 4 Cut Hole Out Of Door
- After the holes are connected, use a reciprocating saw, scroll saw or jig saw to cut out the opening along the lines you've marked.
Optional Step Attach Rain Cap
- If you elected to use the rain cap for your petdoor installation, attach it to the outer frame as shown. It will simply hook onto the top of the outer frame
Step 5 Place Frame In Door
- Place the inside frame of the pet door into the opening in the door. Place the outside frame of the pet door into the other side of the door and let the pet door frame telescope together. Squeeze the two sides of the pet doors frame together tightly. You may hold them together with carpenter's clamps as you proceed.
Step 6 Screw Door Into Place
- Using the pre-drilled pilot holes in the pet door frame and the supplied drill bit, drill one hole through the inside edge of the outside frame at the bottom. Insert and loosely tighten one screw. Make sure the door is level and adjust if needed.
- When door is level, tighten the inserted screw and repeat drilling and inserting the rest of the screws in the pet door frame. Also, retighten the screws that hold the pin bolt lock in place.
Step 7 Seal Gaps With Caulk
- Once the pet door is installed you can fill any gaps or seal the edges with caulking if desired.
- After you apply the caulking and smooth it, you can remove the tape for a clean edge and no mess on your people door.
Step 8 Slide Locking Cover On
- The Starboard® cover will slide easily into place in the built in frame and can be easily locked and unlocked with the positive action pin bolt lock.
Step 10 Clean-Up Door
- Remove the drop cloths and clean up the area. We recommend cleaning the frame and flaps of the pet door also. Use soap and water or glass cleaner without ammonia.
How to Adjust Magnets
You may also adjust the magnets in the frame if necessary. They can either be raised or lowered so the flaps seal but swing freely.
Adjust Upward
- Adjust the magnets upward by twisting a flat headed screwdriver below the magnet between the magnet and the frame.
Adjust Downward
- Adjust the magnets downward by tapping lightly with the handle of your screwdriver.
Note:
- NEVER hit a magnet hard with a hammer as this may bend the legs of the magnet and cause it to eventually fall out of the door track.
![]()
Notes for Various Types of Doors
Raised Panel Doors
![]()
Two types of raised panel door are illustrated above. A true raised panel door will be built of solid wood, and the panels will be separate pieces of wood contained in the body of the door. This type of door is common on older homes, but in newer homes you are more likely to find doors whose surfaces have been molded to look like a raised panel door.
Carefully consider placement of your pet door before cutting the rough opening. Ideally, the pet door should be either centered on the door or centered on a panel. If the door is a true raised panel door, centering the pet door on the people door is not a good idea. Cutting out the vertical support will structurally weaken the door.
Once you have determined where to place the door, cut out the rough opening and install the pet door as described above. There should be gaps that need to be filled between the pet door and the door where the grooves from the raised panel are. Put blue masking tape on the door so that the bottom of the tape is even with the top of the pet door. Fill the gaps with "caulking backer rod". Make sure your filler does not come up to the edge of the pet door frame.
Fill the gap with caulk of an appropriate type and color. Smooth the caulk with a putty knife or a razor blade. Remove the blue tape carefully. Clean up and you are finished.
Cross Hatch Doors
![]()
To drill starter holes through a solid wood door, use a 7/8" paddle bit and drill almost all the way through the door. Go to the other side of the door and finish the hole. This will prevent splintering wood.
![]()
A crosshatch door, also called a farmhouse door, usually has a window in the upper half. The lower half is constructed very much like a raised panel door, but the panels are usually sunken in compared to the rest of the door. These doors are almost always solid wood. Be very careful when drilling your starter holes in wood. If you push too hard the wood may splinter.
Installation of the pet door is about the same as with any other door. The difficulty is filling in the gaps. Depending on how deep the gap is, there are several different ways to approach this. If the gap is not very deep, caulking backer rod and caulk will work nicely. If the gap is deep you may want to consider filling with pieces of wood. This will require a hacksaw, miter box, and careful measuring.
Hollow Core Doors
If you are installing in a hollow core door, don’t cut your rough opening with a reciprocating saw if you can avoid it. It tends to shake the door surface violently, sometimes separating it from the interior “honeycomb”. Use a circular saw and diamond blade. It makes a clean, easy cut.
Fiberglass Doors
Fiberglass doors can be cut with a reciprocating saw or a circular saw with a diamond blade but be sure to wear a good dust mask! You do not want to be inhaling fiberglass.
Wood Doors
Cut wood doors with a reciprocating saw. Do not try to use the circular saw. The diamond blade will simply scorch the wood, barely cutting it, and a wood blade will grab the wood and take off, which will be dangerously hard to control.
Steel Skin Doors
Steel skin doors are made of a foam core covered with thin steel skin. If the pet door you are installing is small, (medium or smaller), you can cut the rough opening with a diamond blade and clean up the corners with a reciprocating saw. If the pet door is larger than a medium, sink the diamond blade into the door in one spot on all four sides of the rough opening. This creates four grooves you can get a reciprocating saw blade into. Use a fine blade on the reciprocating saw. (18-tooth per inch at a minimum.)
FAQ
What is the main difference between this weather proof and others?The Hale pet door offers a flexible, vinyl flap while other weatherproof models choose harder flap material, such as the freedom pet pass pet door with a canvas flap. These vinyl flaps are thicker than standard, offering a greater resistance to extreme weather. |
How can I make the Hale Double Flap Dog Door easier for my small pet to use?You can remove magnets to make the flap easier for smaller pets to push through. |
Why would I need a left or right locking load?Hale gives you options on how your locking cover opens based on the unique locations your door will be in. These options are included in case there is a lip above your frame that would stop your locking cover from sliding up. You can open your cover left or right depending on other obstructions on either side of the installation location. |
Where do you buy replacement flaps?Hale Replacement Flaps can be bought on our site. These flaps do not have logos on them, so it would be best to measure the flaps to make sure the correct size is ordered. |
What is the difference between single and double flap Hale pet doors?The Hale double flap dog door increases resistance to extreme weather. These are great options for blazing summer and snowy winters. While a Hale single flap can do the job of some double flap models, the additional vinyl can safeguard from wind and single digit temperatures. |
Does this door come in other colors?Yes; it comes in Satin, Arizona Beige (Tan), White, and Bronze. See pictures above for color samples. |
Can I attach a locking cover on both sides of the Hale dog door unit?If you want a locking cover on both sides, that would be a special order. Please let us know beforehand if you want to make that happen. Once you have the door in your home, an additional locking cover cannot be added the other side. The exterior locking cover can also only be manufactured to open from the left or right. |
Can my cats use a double flap?Cats should be able to push through a double flap mount, even if it is a doggy door for big dogs. It helps there will be a tunnel, since the two flaps will not be back to back so your cat will only go through one flap at a time. Even the large Hale pet door sizes have lightweight flaps that are manageable for small pets. If they are still having difficulty, you can also remove some magnets to lessen the resistance. |
If I get a single flap can I add another one later?Yes! All you would have to do is purchase a replacement flap kit, which comes with everything you need. |
Can you use this on a dutch door?Yes, this is a really good choice for that because if there is anything (like a sill above it sticking out) then you can choose one of the side load locking cover options. |
Is this the same as the maxseal?No, that is made by a different manufacturer and parts and dimensions are not the same. |
Can I install this into my wall?To install a Hale door into a wall, check out the Hale Pet Door for Walls. |
Warranty
LIFETIME FRAME WARRANTY / 10 - YEAR PARTS WARRANTY INCLUDING FLAPS
HALE PET DOOR™
LIFETIME FRAME WARRANTY
(10 YEAR PARTS WARRANTY - INCLUDING FLAPS)
Thank you for doing business with Hale Pet Door™. We are sure you will receive years of excellent service with your purchase. If the product does not meet your expectations, please contact our office for return authorization and return it within 30 days of purchase for a full refund of the purchase price. Be sure to pack the product well as we can only give 50% credit for a damaged pet door.
Hale Pet Door guarantees and warrants, subject to the conditions and restrictions stated below, that the Hale Pet Door™ products and component parts thereof, purchased from Hale Pet Door shall be free from any defects in materials and workmanship. The warranty period for all Hale Pet Door™ model pet doors is effective from the date of purchase and extends to the anniversary date marking the end of the tenth year. We agree to exchange at our expense.
New and Improved Flaps with the Best Vinyl Imported from France, Made with the Custom Hale Pet Door Chemical Recipe
The Best Lifetime Frame Warranty - (No Questions Asked, Does Not Include Flaps, Parts, Shipping, or Labor)
- 1st and 2nd year – 100% of all parts are covered
- 3rd and 4th year - 80% of all parts are covered
- 5th and 6th year – 60% of all parts are covered
- 7th and 8th year – 40% of all parts are covered
- 9th and 10th year – 20% of all parts are covered
This warranty does not include shipping to Hale Pet Door or any field service labor.
A-Glass Breakage: We use fully tempered glass of the greatest quality and strength available for each application in our window, panel and storm window replacement model pet doors. It also meets or exceeds all safety glazing laws and codes in the United States. Even tempered glass will break on occasion, but it is very rare. When there is a breakage of glass, for whatever reason, within the FIRST YEAR, we will replace the unit for 50% of the current total price. There is no warranty on glass after the first year. This warranty excludes the glass in windows and doors through which our in-glass models are installed. For glass breakage in those instances, you would need to contact the company who installed your window or people door.
Hale Pet Door will credit 50% towards the cost of a replacement Hale Pet Door™ that was damaged due to miscutting, mismeasuring or any other damage due to no fault of Hale Pet Door within 30 days of purchase. Hale Pet Door will not accept any responsibility beyond 50% if damage is due to no fault of Hale Pet Door. This document supersedes all previous warranty documents.