


PetSafe Wall Kit for the Electronic Smart Doors


- Seamless integration: PetSafe Wall Kit for Electronic Smart Doors is designed for walls 4-3/4" to 7-1/4" thick
- Self-framing tunnel: Ensures a clean, professional look while accommodating large door flaps with an optional 2" wall extension
- Watertight protection: The white wall liner prevents water damage and debris infiltration
- Easy installation: Includes hardware, cutting template, and detailed instructions for hassle-free setup
- Flexible placement: Wall entry kit compatible with PetSafe Electronic Smart Doors for optimal location choice
 Product Details
Product Details
Upgrade your living space and provide your pet with the freedom they deserve using the PetSafe Wall Kit for Electronic Smart Doors. This innovative wall entry kit allows you to seamlessly integrate your PetSafe Electronic Smart Door into walls with a thickness of 4-3/4" to 7-1/4", giving you the flexibility to choose the optimal location for your pet's entrance and exit.
The self-framing tunnel ensures a clean, professional look, while the white wall liner adds a watertight barrier to protect your walls from water damage and debris infiltration. For those with larger door flaps, an optional 2" wall extension is available to accommodate thicker walls, providing a perfect fit for your electronic pet door.
Installation is a breeze with the telescoping tunnel design, allowing for quick framing of wall cutouts and ensuring a perfect fit every time. The PetSafe Wall Kit comes complete with an exterior frame, tunnel, installation hardware, cutting template, and detailed instructions, so you can confidently install your electronic pet door without worry.
By choosing the PetSafe Wall Kit for Electronic Smart Doors, you're not only investing in a high-quality product but also giving your pet the gift of freedom and independence. Experience the convenience, flexibility, and peace of mind that comes with this state-of-the-art solution for your pet's access needs.
Features:
- Transform your space: Enable wall installation of PetSafe Electronic Smart Doors for a modern, versatile design
- Telescoping tunnel: Quickly and easily frame wall cutouts for a perfect fit every time
- Optional extension: Accommodate thicker walls with a 2" wall extension for large door flaps
- Water-resistant liner: The white wall liner provides a watertight seal to protect your home
- Complete kit: Exterior frame, tunnel, installation hardware, cutting template, and instructions included for your convenience
Size Chart
| Flap Size | Flap Dimension | Rough Cut Out | Wall Thickness |
|---|---|---|---|
| Small | 6 5/8" w x 8" h | 8 3/8" w x 14 13/16" h | 3 3/4" - 7" |
| Large | 13" w x 15 3/4" h | 15 3/4" w x 23 1/2" h | 3 3/4" - 7" |
| Large Ext | 2" extension for large | n/a | Adds 2" to range for large size |
Installation Instructions
Installation Instructions
Measure and Cut Wall Access
Before installing, ensure your pet will be able to use the door from the inside and the outside. Check for electrical wiring or pipes in the wall area. If you must, cut a small hole within the wall to verify if there are any studs, wiring, or plumbing.
1. Using a stud finder, find the edge of a stud. Draw a 5” vertical line on the edge of that stud about one foot off the floor.
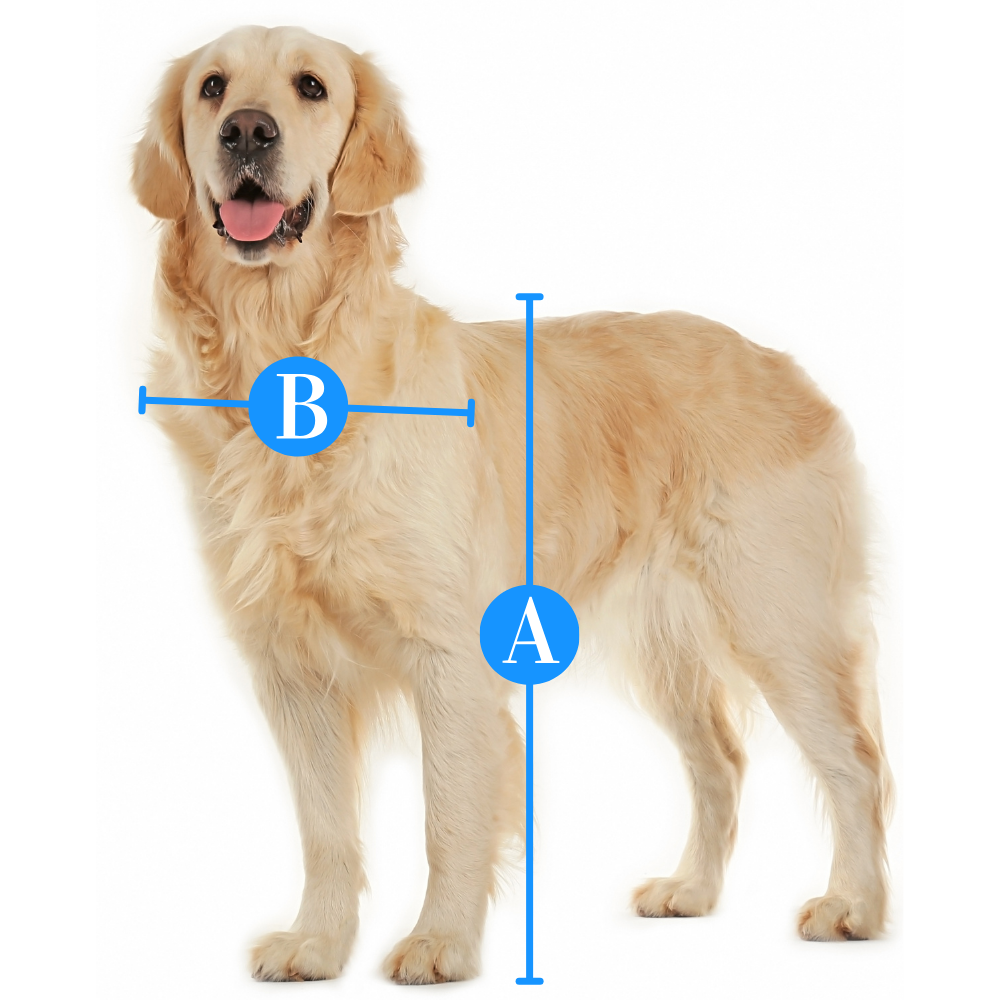
2.Draw a horizontal line through a mark of the shoulder height of your pet.
3.Now, cut the template to the appropriate size (8 5/8” x 15 5/8”). Put the template against the wall, and align the shoulder height line on the template with the shoulder height line you drew on the wall. Make sure your template is on the EDGE of the stud, and not over it.
4. Trace the template to the wall with a pencil.
5. For Large Models, keep in mind you are cutting a hole from the inside edge of one stud to the inside edge of its neighboring stud. In common framing, this space should measure 14 ½”
6. Now, drill the four corners all the way through the wall, using a 5/16” drill bit. Make sure to keep the drill level with the wall.
7.With a jigsaw or another cutting device, cut the hole.
a. For Large Models, use the Inside of Frame A to check the fit. Don’t force anything. If the hole is too small, just remove the frame and re-cut or file the hole slightly to enlarge. Do not cut more than 1/8” from your previous cut. Once it fits, adjust the frame so it’s level and square.
8.Now, repeat the previous steps for the Outside frame. You can use the previously drilled holes as your corners. Check that your lines match, and measure frequently.
Installing the Supports
1.Measure the width from the inside of the outer wall to the inside of the inner wall.
2. Cut a block of 2” x 4” or 2” x 6” wood to 6” – 8” long for use as a support beam.
3.Remove any debris that may be inside the wall.
4.Place the support beam inside the wall so that the top is even with the bottom of the cut-outs.
5.Use 2 decking screws to attach the inner side of the support beam. Make sure it is flush with the bottom of the cut-outs.
6. Now, on the outside, use 2 decking screws to fasten the outer portion of the support beam. You might need to drill a hole through the siding slightly larger than the heads of the screw if you’re placing screws into vinyl siding.
7.If needed, repeat the process with a vertical length of 2” x 4” or 2” x 6”. This will become the vertical support that you will end us fastening the edge of the frame into.
Small Door Only
Attach the SmartDoor to the Wall Extension Frame A (Small Door)
1.Locate the Inside Frame A. It will have 6 screw cups along the outer edge.
2.Place the inside portion of your Electronic SmartDoor inside the frame.
3. Secure the SmartDoor to the Inside Frame A with a machine screw in each of the four corners. On the backside of the frame, add a lock washer and then tighten each of the 4 hex nuts.
Install the Assemblies into the Wall (Small Door)
1. Insert the SmartDoor assembly from Step 3 into the inside wall. The frame should be flush with the wall and level both vertically and horizontally.
2.Locate the Outside Frame B for outdoor placement. It should have 8 screw cups along the outer edge.
3.Beginning inside, install the 6 Phillips head wood screws and washers through Outside Frame A into your wall and the 2” x 4” or 2” x 6” support you installed earlier. Do not overtighten.
4.From the outside, install the 8 Phillips head wood screws and washers through Outside Frame B into wall and into the 2” x 4” or 2” x 6” support you installed earlier.
5.Use window caulking to fill in any seams and gaps in your installation.
6.Install the batteries. Your door is now ready! You can begin training your pet.
Large Door Only
Attach the SmartDoor to the Wall Extension Tunnel (Large Door)
1. Place the SmartDoor in the lip of the tunnel extension.
2. Tape the tunnel extension to the SmartDoor. The rear door frame of the SmartDoor won’t be used in the wall installation.
Install the Assemblies into the Wall
1. From outside, place the frame in the wall. Make sure the frame is level vertically and horizontally before putting in any screws.
2. Insert the SmartDoor and the Tunnel Extension assembly from inside the home.
3. Beginning indoors, install the 6 Phillips head wood screws through the SmartDoor into the wall, and into the 2” x 4” or 2” x 6” support beam installed earlier. Do not overtighten.
4. Moving outdoors, drill holes and install 4 Phillips head wood screws, one in each corner of the outside frame. These screws should pass through the frame, the wall, and fasten into the framing studs on either side of the framed tunnel.
5. Use window caulking to fill in any seams and gaps in your installation.
6. Install batteries. Your door is ready! You can begin training your pet.
FAQ
Will I need additional extension tunnels for installing my large smartdoor into a drywall or brick wall?It depends on how thick the drywall construction or brick installation is. If it is more than then 2" thick, then you will need additional wall entry frames along with the traditional framing that already comes with the door. |
How can I make sure that my pet will fit the pet door?First, follow our pet measurement guide to figure out if your pet needs a small to extra-large pet door. To double-check you have the right flap size, cut a hole into a piece of cardboard, and make the cut-out size the same as the flap dimensions. If your pet can walk through it easily, then you have the right size pet door. You can also use it as an outdoor cutout guide for cutting into your wall when installing the PetSafe Electronic Small Smart Door. |
Where can I buy replacement flaps for the PetSafe pet products Electronic smart door?You will need to buy replacement flaps for your electronic small dogs and cat door directly from the manufacturer. If you need a replacement flap for another door, check out our full selection of replacement pet supplies and accessories. |
Warranty
Warranty Information:
Radio Systems Corporation is the industry leader in Consumer Pet Electronics; products are marketed under the PetSafe, Innotek, Invisible Fence, Guardian, Staywell, and SportDOG brands. Radio Systems Corporation and its authorized resellers (who display the appropriate sanctioned logos) only sell new products in original packaging. Product represented as used, refurbished, or “as-is”, or not in the original packaging will not be covered by our warranty, or any consumer support.
We are committed to consumer satisfaction. To that end Radio Systems Corp. cautions consumers from purchasing any product other than product in its original packaging or specially marked refurbished packaging.
Proof of Purchase must be provided to our customer care center before a warranty claim can be honored. For your convenience, you may register your product and provide proof of purchase immediately after your purchase. Thereafter, proof of purchase will not be required to fulfill a warranty claim. Products may be registered at www.petsafe.net/register-product. Proof of purchase is accepted via e-mail (receipt@petsafe.net), fax, or traditional mail. Proof of purchase is defined as the sales receipt or copy of the sales receipt.
Fax: 800-332-7942
Mail: Attn: Customer Care Center/POP Radio Systems Corporation 10427 PetSafe Way Knoxville TN 37932
One Year Non-Transferable Limited Warranty:
What is Covered
Radio Systems Corporation, owner of the PetSafe Brand, (hereinafter referred to as “PetSafe”) warrants to the original retail consumer purchaser, and not any other purchaser or subsequent owner, that its PetSafe product, when subject to normal and proper residential use, will be free from defects in material or workmanship for a period of one (1) year from the purchase date. An “original retail consumer purchaser” is a person or entity who originally purchases the product or a gift recipient of a new product that is unopened and in its original packaging. When serviced by PetSafe Customer Service, PetSafe covers labor and parts for the first year of ownership; after the first year, a service or upgrade charge will apply relative to replacement of the product, with new or refurbished items at PetSafe’s sole discretion. The limited warranty is non-transferable and shall automatically terminate if the original retail consumer purchaser resells the PetSafe product or transfers the property on which the PetSafe product is installed. In the event of defect, these are your exclusive remedies.
Proper Product Use
This product is designed only for use with domesticated animals; do not use this product for any other purpose. However, the specific temperament of your animal may not work with this product. We recommend that you do not use this product if your animal is aggressive. If you are unsure whether this product is appropriate for your animal, please consult with your veterinarian or a certified trainer before you use this product. Please see the instruction manual for additional important information.
What is Not Covered
This non-transferrable limited warranty does not provide protection against, and PetSafe will have no liability under this non-transferrable limited warranty for any damage to or defects in the products caused by any animal, loss of product(s), failure, defect or damage caused by events and situations beyond normal residential exposure conditions, including, but not limited to: commercial use, misuse, abuse, neglect, improper installation or installation not in accordance with PetSafe’s instructions, use of non-PetSafe accessories, impacts of foreign objects, acts of God, abnormal or improper use, improper storage, attempted repair or service by anyone other than PetSafe Customer Service, accident, alteration, defects in or failure of the surface the PetSafe product is installed in or upon, discoloration or other damage caused by pollution, sunlight, other environmental conditions, mold, dirt, mildew, or exposure to harmful chemicals and any other cause not involving manufacturing defects in the PetSafe product. Under no circumstances will PetSafe be liable for any non-PetSafe labor charges or any expenses whatsoever in connection with the removal, repair, or installation of either the original or replacement component(s) relative to in-ground fence installation, kennel installation, pet door installation, and other permanent, semi-permanent, or fixture type installations on the retail consumer purchaser’s property.
Registering the Product
Within thirty (30) days of purchase, please go to www.petsafe.net/register-product to register your purchase. A sales receipt shall be required to obtain warranty coverage. Please keep this information in a safe place.
Making a Warranty Claim
To obtain warranty service, call the PetSafe Customer Care center. In the United States or Canada, 1-800-732-2677; in Australia, 1800 786 608; in New Zealand, 0800 543 054.
Pursuant to this non-transferrable limited warranty, PetSafe will replace the part with a new or refurbished part. This non-transferrable limited warranty will then apply to either the new or refurbished part for the remainder of the original non-transferrable limited warranty period.
Disclaimers
Replacement as provided under this non-transferrable limited warranty is the exclusive remedy of the consumer. Neither labor to remove the part nor labor to install the refurbished or replaced part is covered.
This non-transferrable limited warranty is in lieu of all other express warranties. PetSafe expressly disclaims and excludes all other warranties, express or implied, including without limitation, the warranties of merchantability and fitness for a particular purpose. PetSafe also disclaims and excludes all liability for incidental, consequential, punitive, direct, indirect, special, or any other damages arising out of or connected with the purchase, use, or misuse of this product or for the breach of any express or implied warranties or breach of contract or otherwise. Purchaser assumes all risks and liabilities from the use or misuse of this product. PetSafe does not authorize any other person or agent to make any other express or implied warranties.
Furthermore, PetSafe will not be liable for any loss, damage, or injury resulting from delay in delivery of replacement parts or for any failure by PetSafe to perform covered repair work due to circumstances beyond PetSafe’s control.
Governing Law
This non-transferrable limited warranty shall be governed by the law of the State of Tennessee, U.S.A., and by the laws of the United States of America, excluding their conflicts of laws principles. Furthermore, the United Nations Convention on Contracts for the International Sale of Goods is hereby excluded in its entirety from application to this non-transferrable limited warranty. Jurisdiction and venue shall be exclusive to the courts of Knox County, Tennessee. These warranties give you specific legal rights, and you may also have other rights that vary from state to state or country to country. Some states or countries do not allow the exclusion or limitation of incidental or consequential damages, so the above limitation or exclusion may not apply to you.
Making a Warranty Claim:
If you need assistance or to make a warranty claim, please contact our Customer Care Center for help in troubleshooting and, if necessary, to arrange a warranty repair for your product.
Customer Reviews

Size Chart
| Flap Size | Flap Dimension | Rough Cut Out | Wall Thickness |
|---|---|---|---|
| Small | 6 5/8" w x 8" h | 8 3/8" w x 14 13/16" h | 3 3/4" - 7" |
| Large | 13" w x 15 3/4" h | 15 3/4" w x 23 1/2" h | 3 3/4" - 7" |
| Large Ext | 2" extension for large | n/a | Adds 2" to range for large size |
Installation Instructions
Measure and Cut Wall Access
Before installing, ensure your pet will be able to use the door from the inside and the outside. Check for electrical wiring or pipes in the wall area. If you must, cut a small hole within the wall to verify if there are any studs, wiring, or plumbing.
1. Using a stud finder, find the edge of a stud. Draw a 5” vertical line on the edge of that stud about one foot off the floor.
2.Draw a horizontal line through a mark of the shoulder height of your pet.
3.Now, cut the template to the appropriate size (8 5/8” x 15 5/8”). Put the template against the wall, and align the shoulder height line on the template with the shoulder height line you drew on the wall. Make sure your template is on the EDGE of the stud, and not over it.
4. Trace the template to the wall with a pencil.
5. For Large Models, keep in mind you are cutting a hole from the inside edge of one stud to the inside edge of its neighboring stud. In common framing, this space should measure 14 ½”
6. Now, drill the four corners all the way through the wall, using a 5/16” drill bit. Make sure to keep the drill level with the wall.
7.With a jigsaw or another cutting device, cut the hole.
a. For Large Models, use the Inside of Frame A to check the fit. Don’t force anything. If the hole is too small, just remove the frame and re-cut or file the hole slightly to enlarge. Do not cut more than 1/8” from your previous cut. Once it fits, adjust the frame so it’s level and square.
8.Now, repeat the previous steps for the Outside frame. You can use the previously drilled holes as your corners. Check that your lines match, and measure frequently.
Installing the Supports
1.Measure the width from the inside of the outer wall to the inside of the inner wall.
2. Cut a block of 2” x 4” or 2” x 6” wood to 6” – 8” long for use as a support beam.
3.Remove any debris that may be inside the wall.
4.Place the support beam inside the wall so that the top is even with the bottom of the cut-outs.
5.Use 2 decking screws to attach the inner side of the support beam. Make sure it is flush with the bottom of the cut-outs.
6. Now, on the outside, use 2 decking screws to fasten the outer portion of the support beam. You might need to drill a hole through the siding slightly larger than the heads of the screw if you’re placing screws into vinyl siding.
7.If needed, repeat the process with a vertical length of 2” x 4” or 2” x 6”. This will become the vertical support that you will end us fastening the edge of the frame into.
Small Door Only
Attach the SmartDoor to the Wall Extension Frame A (Small Door)
1.Locate the Inside Frame A. It will have 6 screw cups along the outer edge.
2.Place the inside portion of your Electronic SmartDoor inside the frame.
3. Secure the SmartDoor to the Inside Frame A with a machine screw in each of the four corners. On the backside of the frame, add a lock washer and then tighten each of the 4 hex nuts.
Install the Assemblies into the Wall (Small Door)
1. Insert the SmartDoor assembly from Step 3 into the inside wall. The frame should be flush with the wall and level both vertically and horizontally.
2.Locate the Outside Frame B for outdoor placement. It should have 8 screw cups along the outer edge.
3.Beginning inside, install the 6 Phillips head wood screws and washers through Outside Frame A into your wall and the 2” x 4” or 2” x 6” support you installed earlier. Do not overtighten.
4.From the outside, install the 8 Phillips head wood screws and washers through Outside Frame B into wall and into the 2” x 4” or 2” x 6” support you installed earlier.
5.Use window caulking to fill in any seams and gaps in your installation.
6.Install the batteries. Your door is now ready! You can begin training your pet.
Large Door Only
Attach the SmartDoor to the Wall Extension Tunnel (Large Door)
1. Place the SmartDoor in the lip of the tunnel extension.
2. Tape the tunnel extension to the SmartDoor. The rear door frame of the SmartDoor won’t be used in the wall installation.
Install the Assemblies into the Wall
1. From outside, place the frame in the wall. Make sure the frame is level vertically and horizontally before putting in any screws.
2. Insert the SmartDoor and the Tunnel Extension assembly from inside the home.
3. Beginning indoors, install the 6 Phillips head wood screws through the SmartDoor into the wall, and into the 2” x 4” or 2” x 6” support beam installed earlier. Do not overtighten.
4. Moving outdoors, drill holes and install 4 Phillips head wood screws, one in each corner of the outside frame. These screws should pass through the frame, the wall, and fasten into the framing studs on either side of the framed tunnel.
5. Use window caulking to fill in any seams and gaps in your installation.
6. Install batteries. Your door is ready! You can begin training your pet.
FAQ
Will I need additional extension tunnels for installing my large smartdoor into a drywall or brick wall?It depends on how thick the drywall construction or brick installation is. If it is more than then 2" thick, then you will need additional wall entry frames along with the traditional framing that already comes with the door. |
How can I make sure that my pet will fit the pet door?First, follow our pet measurement guide to figure out if your pet needs a small to extra-large pet door. To double-check you have the right flap size, cut a hole into a piece of cardboard, and make the cut-out size the same as the flap dimensions. If your pet can walk through it easily, then you have the right size pet door. You can also use it as an outdoor cutout guide for cutting into your wall when installing the PetSafe Electronic Small Smart Door. |
Where can I buy replacement flaps for the PetSafe pet products Electronic smart door?You will need to buy replacement flaps for your electronic small dogs and cat door directly from the manufacturer. If you need a replacement flap for another door, check out our full selection of replacement pet supplies and accessories. |
Warranty
Warranty Information:
Radio Systems Corporation is the industry leader in Consumer Pet Electronics; products are marketed under the PetSafe, Innotek, Invisible Fence, Guardian, Staywell, and SportDOG brands. Radio Systems Corporation and its authorized resellers (who display the appropriate sanctioned logos) only sell new products in original packaging. Product represented as used, refurbished, or “as-is”, or not in the original packaging will not be covered by our warranty, or any consumer support.
We are committed to consumer satisfaction. To that end Radio Systems Corp. cautions consumers from purchasing any product other than product in its original packaging or specially marked refurbished packaging.
Proof of Purchase must be provided to our customer care center before a warranty claim can be honored. For your convenience, you may register your product and provide proof of purchase immediately after your purchase. Thereafter, proof of purchase will not be required to fulfill a warranty claim. Products may be registered at www.petsafe.net/register-product. Proof of purchase is accepted via e-mail (receipt@petsafe.net), fax, or traditional mail. Proof of purchase is defined as the sales receipt or copy of the sales receipt.
Fax: 800-332-7942
Mail: Attn: Customer Care Center/POP Radio Systems Corporation 10427 PetSafe Way Knoxville TN 37932
One Year Non-Transferable Limited Warranty:
What is Covered
Radio Systems Corporation, owner of the PetSafe Brand, (hereinafter referred to as “PetSafe”) warrants to the original retail consumer purchaser, and not any other purchaser or subsequent owner, that its PetSafe product, when subject to normal and proper residential use, will be free from defects in material or workmanship for a period of one (1) year from the purchase date. An “original retail consumer purchaser” is a person or entity who originally purchases the product or a gift recipient of a new product that is unopened and in its original packaging. When serviced by PetSafe Customer Service, PetSafe covers labor and parts for the first year of ownership; after the first year, a service or upgrade charge will apply relative to replacement of the product, with new or refurbished items at PetSafe’s sole discretion. The limited warranty is non-transferable and shall automatically terminate if the original retail consumer purchaser resells the PetSafe product or transfers the property on which the PetSafe product is installed. In the event of defect, these are your exclusive remedies.
Proper Product Use
This product is designed only for use with domesticated animals; do not use this product for any other purpose. However, the specific temperament of your animal may not work with this product. We recommend that you do not use this product if your animal is aggressive. If you are unsure whether this product is appropriate for your animal, please consult with your veterinarian or a certified trainer before you use this product. Please see the instruction manual for additional important information.
What is Not Covered
This non-transferrable limited warranty does not provide protection against, and PetSafe will have no liability under this non-transferrable limited warranty for any damage to or defects in the products caused by any animal, loss of product(s), failure, defect or damage caused by events and situations beyond normal residential exposure conditions, including, but not limited to: commercial use, misuse, abuse, neglect, improper installation or installation not in accordance with PetSafe’s instructions, use of non-PetSafe accessories, impacts of foreign objects, acts of God, abnormal or improper use, improper storage, attempted repair or service by anyone other than PetSafe Customer Service, accident, alteration, defects in or failure of the surface the PetSafe product is installed in or upon, discoloration or other damage caused by pollution, sunlight, other environmental conditions, mold, dirt, mildew, or exposure to harmful chemicals and any other cause not involving manufacturing defects in the PetSafe product. Under no circumstances will PetSafe be liable for any non-PetSafe labor charges or any expenses whatsoever in connection with the removal, repair, or installation of either the original or replacement component(s) relative to in-ground fence installation, kennel installation, pet door installation, and other permanent, semi-permanent, or fixture type installations on the retail consumer purchaser’s property.
Registering the Product
Within thirty (30) days of purchase, please go to www.petsafe.net/register-product to register your purchase. A sales receipt shall be required to obtain warranty coverage. Please keep this information in a safe place.
Making a Warranty Claim
To obtain warranty service, call the PetSafe Customer Care center. In the United States or Canada, 1-800-732-2677; in Australia, 1800 786 608; in New Zealand, 0800 543 054.
Pursuant to this non-transferrable limited warranty, PetSafe will replace the part with a new or refurbished part. This non-transferrable limited warranty will then apply to either the new or refurbished part for the remainder of the original non-transferrable limited warranty period.
Disclaimers
Replacement as provided under this non-transferrable limited warranty is the exclusive remedy of the consumer. Neither labor to remove the part nor labor to install the refurbished or replaced part is covered.
This non-transferrable limited warranty is in lieu of all other express warranties. PetSafe expressly disclaims and excludes all other warranties, express or implied, including without limitation, the warranties of merchantability and fitness for a particular purpose. PetSafe also disclaims and excludes all liability for incidental, consequential, punitive, direct, indirect, special, or any other damages arising out of or connected with the purchase, use, or misuse of this product or for the breach of any express or implied warranties or breach of contract or otherwise. Purchaser assumes all risks and liabilities from the use or misuse of this product. PetSafe does not authorize any other person or agent to make any other express or implied warranties.
Furthermore, PetSafe will not be liable for any loss, damage, or injury resulting from delay in delivery of replacement parts or for any failure by PetSafe to perform covered repair work due to circumstances beyond PetSafe’s control.
Governing Law
This non-transferrable limited warranty shall be governed by the law of the State of Tennessee, U.S.A., and by the laws of the United States of America, excluding their conflicts of laws principles. Furthermore, the United Nations Convention on Contracts for the International Sale of Goods is hereby excluded in its entirety from application to this non-transferrable limited warranty. Jurisdiction and venue shall be exclusive to the courts of Knox County, Tennessee. These warranties give you specific legal rights, and you may also have other rights that vary from state to state or country to country. Some states or countries do not allow the exclusion or limitation of incidental or consequential damages, so the above limitation or exclusion may not apply to you.
Making a Warranty Claim:
If you need assistance or to make a warranty claim, please contact our Customer Care Center for help in troubleshooting and, if necessary, to arrange a warranty repair for your product.